
*This post may contain affiliate links, which means I may receive a commission (at no additional cost to you!) if you make a purchase using any of these links.*

If there’s one flower that never fails to steal the show, it’s ranunculus. With their delicate paper-thin petals and whimsical winding stems that seem straight out of a fairytale, these blooms bring both elegance and charm to any floral arrangement. While hydrangeas and peonies often get the spotlight, ranunculus flowers bring a unique blend of softness and texture that can make any centerpiece stand out. However, they can be tricky to work with and are often pricey, especially when out of season. That’s why I’ve put together this in-depth guide to help you care for, arrange, and highlight ranunculus in your floral designs. Whether you’re crafting a lush bouquet for a wedding or a simple ranunculus flower arrangement for a seasonal tablescape (like this one!), these tips will help you make the most of these gorgeous blooms!
How to Care for Ranunculus Flowers

Ranunculus are seasonal flowers, and they’re particularly pricey ones at that. Even if you order them in bulk in peak season, they may still cost $2-3 per stem. Ergo, proper care is essential for ensuring your ranunculus flowers stay fresh and vibrant for as long as possible. Since they are delicate and tend to have a shorter lifespan than some hardier flowers, following these essential care tips will help you get the most out of them–
1. Cut the Stems at a 45-Degree Angle
Ranunculus flowers are particularly thirsty, so cutting the stems at a 45-degree angle allows for maximum water absorption. This little trick helps them stay hydrated and fresh longer. Additionally, remember to give the stems a fresh cut every few days to keep them drinking efficiently (I touch more on this in #5!).
2. Use Lukewarm Water
Lukewarm water helps the flower food dissolve quickly and allows the stems to absorb water more efficiently. This is especially useful for reviving wilted blooms and maintaining their vibrant colors. However, avoid using hot water, as it can damage the stems and encourage bacteria growth.
3. Keep Water Levels Low
Unlike sturdier flowers, ranunculus stems are hollow and prone to rotting if submerged in too much water. To prevent premature wilting, only add 2-3 inches of water to your vase.
4. Store Them in a Cool Place
Ranunculus flowers are highly sensitive to heat and direct sunlight. To extend their lifespan, keep them in a cool shaded area and away from direct heat sources, like sunny windows or kitchen appliances.
5. Change the Water Regularly
This is one of the best floral tips I learned from the show Full Bloom, which I highly recommend if you have HBO Max. Bacteria build-up is one of the biggest threats to the longevity of your ranunculus flowers. Change the water every day (or at minimum every other day) and remove any submerged foliage to keep bacteria at bay.
6. Invest in the Right Flower Care Tools
If you frequently work with delicate flowers like ranunculus, investing in the right floral tools can make all the difference. Essential tools include–
- Floral Shears– High-quality shears, like these Chikamasa floral shears, help ensure clean cuts for better water absorption. You probably also want to have some heavier duty garden shears on hand, too, for thicker stems and branches.
- Floral Tape and Other Stem Support Tools– These support tools help structure your arrangements, keeping the more delicate stems in place. Floral tape is great because it’s waterproof. If you don’t have any on hand, regular Scotch tape works fine, too. I also like to keep chicken wire, flower frogs, and extra wide clear straws in my toolkit, as well.
- Flower Food– Always have extra packets of flower food on hand. It’s an easy and inexpensive way to extend the life of your blooms. Most grocery bouquets come with flower food, but if yours doesn’t, ask the florist for a few packets. I’ve never had anyone tell me no.
- Misting Spray Bottle– Regularly misting your flowers helps keep them hydrated and prevents premature wilting. I personally recommend investing in an actual floral spray (like this one) to keep blooms hydrated, although regular water works fine, too.
Click below to shop all my favorite flower care tools!

Ranunculus Flower Arrangement Tips

Now that you know how to care for your ranunculus flowers, it’s time to create a show-stopping arrangement. While these flowers are naturally interesting and beautiful, strategic styling can enhance their impact. Here are some expert tips to help you design an elegant ranunculus centerpiece–
1. Support the Stems for Better Structure
Ranunculus stems are long, thin, and often curved, making them prone to drooping. To keep them upright, try these techniques–
- Use a vase with a narrow neck for natural support. Some of my favorite containers are actually old liquor bottles. Cluster a handful together for a unique centerpiece!
- Create a tape grid across the top of your vase to hold stems in place. Chicken wire and clustered mason jars also help create structure. I personally prefer the mason jar technique because it’s much easier to change the water, and clean water is particularly important for ranunculus.
-
Insert delicate stems, like taller ranunculus and Gerbera daisies, into boba straws for additional support. Just be sure to effectively hide them within the arrangement.

2. Remove Excess Leaves for a Cleaner Look
Ranunculus leaves are often small, discolored, or wilted, and they don’t add much visual appeal. Removing them allows the beauty of the blooms to take center stage while also reducing the risk of bacteria growth in the water.
3. Very Stem Height for Dimension
Cut some stems shorter and leave others slightly taller to create depth and movement in your arrangement. Position the taller stems toward the edges for a natural organic look.

4. Highlight the Natural Shapes of the Stems
One of the most charming aspects of ranunculus is their curved whimsical stems. Instead of forcing them into a rigid arrangement, embrace their natural shape by positioning the stems to arc and flow in different directions. This technique adds visual interest and creates a more dynamic composition.
5. Pair Ranunculus with Complimentary Filler Flowers
While ranunculus flowers are stunning on their own, pairing them with complementary flowers and greenery can make your arrangement even more striking. Some great pairings include–
- Stock and Queen Anne’s Lace: Adds texture and volume.
- Spray Roses and Carnations: Softens the overall look.
- Ferns and Italian Ruscus: Provides a rich, lush contrast.
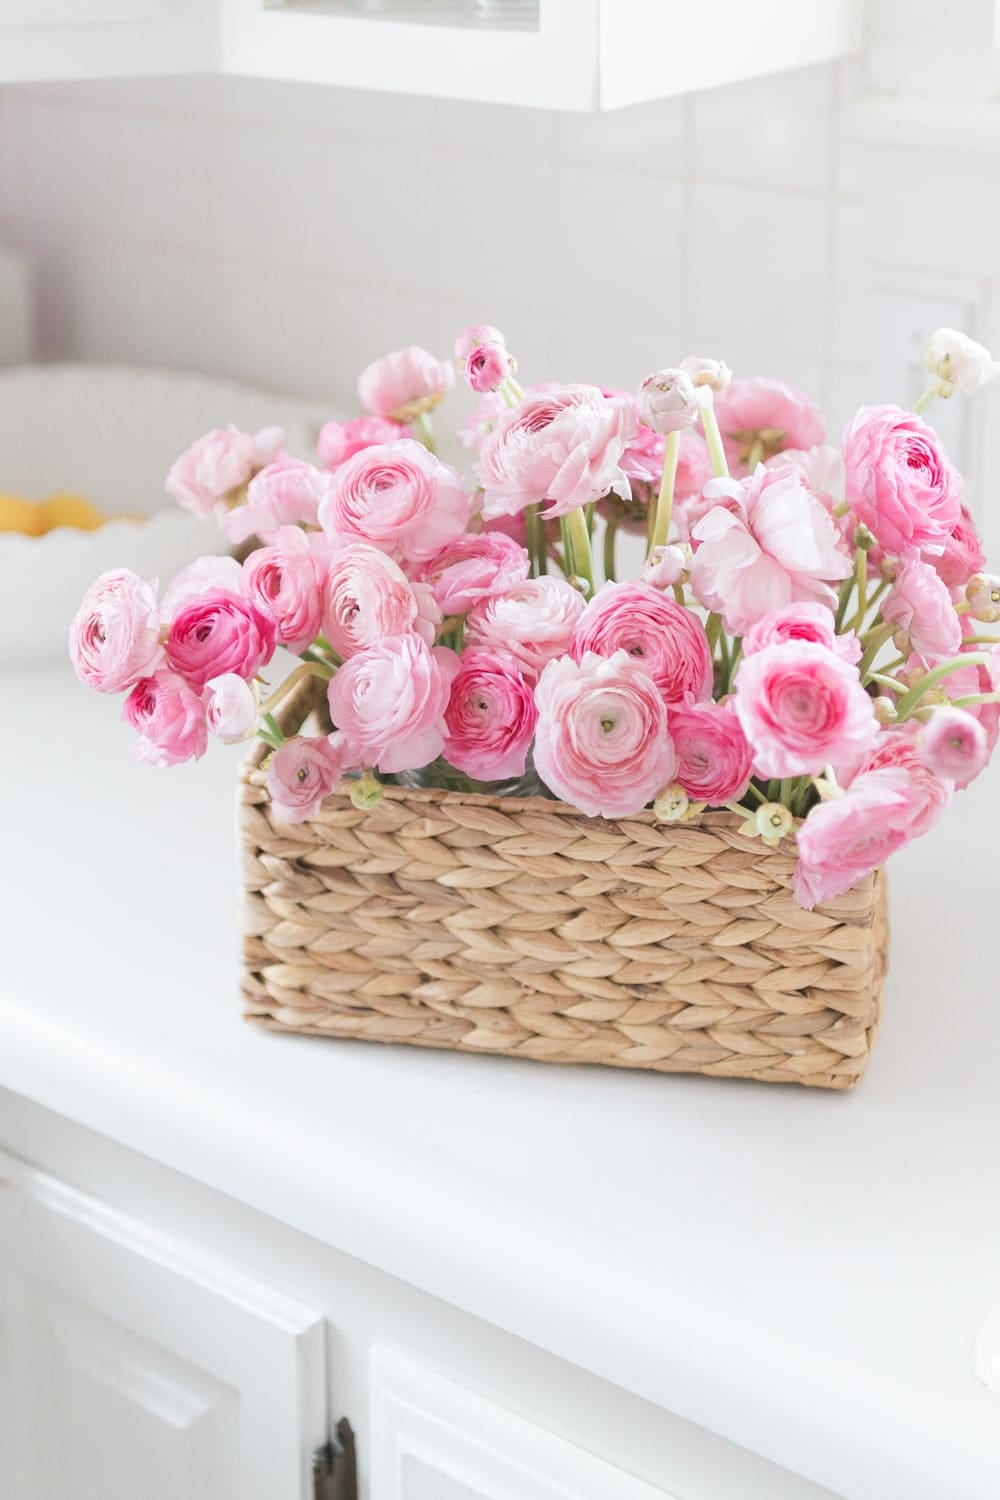
DIY Pink Ranunculus Centerpiece Tutorial

Finally, on to my favorite part of this post– the pink centerpiece tutorial!
A monochromatic pink ranunculus centerpiece is one of the most stunning ways to highlight the beauty of these delicate blooms. This arrangement exclusively uses repetition, a foolproof floral technique that enhances color and balance. If you can find ranunculus in bulk (I recommend ordering from Sam’s Club), this DIY arrangement will look just as stunning as a professionally designed one at a fraction of the cost.
Materials Needed
Here’s everything I used to create this pink ranunculus centerpiece–
- 60 stems of pink ranunculus– Order in bulk from a florist or warehouse store like Sam’s Club. If the cost is too high, mix in affordable fillers like carnations and spray roses.
- 5-6 16oz Mason jars– These provide structural support for the delicate stems. I can normally only fit five in this basket, but six would be even better. Similarly to the tape grid method, the more mason jars you have, the more supported the stems are.
- Small hyacinth basket– Holds the jars in place and adds a rustic touch. I found this one at Home Goods a few years back, but I’m linking near identical basket here.
- Chikamasa floral shears– I use these curved floral shears religiously for precise stem cutting. They’re pricey but a worthy investment if you love floral design!
- Crowning Glory Flower Spray– Helps extend the lifespan of the blooms.
Step-by-Step Instructions

- Fill each Mason jar about one-third full with fresh lukewarm water and arrange them snugly inside the basket to create a stable base for your arrangement. Remember, ranunculus stems are prone to root rot, so the water level in any vase you use should be low.
- Trim the ranunculus stems at varying heights to add depth and dimension. To do this effectively, hold a bunch (10-12 flowers) of ranunculus stems next to your basket. Trim them slightly shorter than the height of the basket and arrange them so that the blooms rest on the rim. As a general rule, always be conservative with your cuts. You can always cut them shorter later.
- Build layers by adding additional clusters of ranunculus, slightly increasing the stem length with each batch. Position a handful of ranunculus stems on the ends to give the left and right sides more dimension. This layering technique creates a natural dome shape with a wider, more dramatic overall composition.
- Fill in any gaps with remaining stems.
- Step back and make final adjustments. Check to see if there are any holes or if anything needs to be moved around for balance. Adjust the stems as needed.
- Mist with Crowning Glory flower spray and change the water daily (or, at minimum, every other day) to keep your arrangement looking vibrant for at least a week.

Beautiful, right?! I love the way it looks on our pink and green Easter tablescape!
Pink Ranunculus Centerpiece
This pink ranunculus centerpiece is guaranteed to add a dramatic splash of color to any spring tablesacpe! Broken down into simple steps, this monochromatic pink centerpiece tutorial is easy enough for even the least experienced florists to follow.
Materials
- 60 stems of pink ranunculus
- 5-6 16 oz Mason jars
- Small hyacinth basket
Tools
- Chikamasa floral shears
- Crowning Glory Flower Spray
Instructions
- Fill each Mason jar about one-third full with fresh lukewarm water and arrange them snugly inside the basket to create a stable base for your arrangement. Remember, ranunculus stems are prone to root rot, so the water level in any vase you use should be low.
- Trim the ranunculus stems at varying heights to add depth and dimension. To do this effectively, hold a bunch (10-12 flowers) of ranunculus stems next to your basket. Trim them slightly shorter than the height of the basket and arrange them so that the blooms rest on the rim. As a general rule, always be conservative with your cuts. You can always cut them shorter later.
- Build layers by adding additional clusters of ranunculus, slightly increasing the stem length with each batch. Position a handful of ranunculus stems on the ends to give the left and right sides more dimension. This layering technique creates a natural dome shape with a wider, more dramatic overall composition.
- Fill in any gaps with remaining stems.
- Step back and make final adjustments. Check to see if there are any holes or if anything needs to be moved around for balance. Adjust the stems as needed.
- Mist with Crowning Glory flower spray and change the water daily (or, at minimum, every other day) to keep your arrangement looking vibrant for at least a week.
Notes
Ranunculus Care Tips
1. Cut the Stems at a 45-Degree Angle
Ranunculus flowers are particularly thirsty, so cutting the stems at a 45-degree angle allows for maximum water absorption. This little trick helps them stay hydrated and fresh longer. Additionally, remember to give the stems a fresh cut every few days to keep them drinking efficiently.
2. Use Lukewarm Water
Lukewarm water helps the flower food dissolve quickly and allows the stems to absorb water more efficiently. This is especially useful for reviving wilted blooms and maintaining their vibrant colors. However, avoid using hot water, as it can damage the stems and encourage bacteria growth.
3. Keep Water Levels Low
Unlike sturdier flowers, ranunculus stems are hollow and prone to rotting if submerged in too much water. To prevent premature wilting, only add 2-3 inches of water to your vase.
4. Store Them in a Cool Place
Ranunculus flowers are highly sensitive to heat and direct sunlight. To extend their lifespan, keep them in a cool shaded area and away from direct heat sources, like sunny windows or kitchen appliances.
5. Change the Water Regularly
Bacteria build-up is one of the biggest threats to the longevity of your ranunculus flowers. Change the water every day (or at minimum every other day) and remove any submerged foliage to keep bacteria at bay.
Ranunculus flowers are undeniably breathtaking, but they require a bit of extra care and attention to keep them looking their best. With the right techniques, you can create stunning, long-lasting centerpieces that bring elegance and charm to any space. Whether you’re designing a ranunculus flower arrangement for a special occasion or simply want to brighten up your home, these tips will hopefully help you make the most of these gorgeous blooms.
Have you worked with ranunculus before? Let me know your favorite flower arranging tips and/or flower care tools in the comments below!


Those are so freaking pretty
I love this. Im going to do the same for my daughter’s graduation party. I purchased the same baskets at the container store. What size mason jars did you use?
Thanks!
Hi Bridget! Thank you so much and sorry for the late reply! I always use the standard 16oz jars– they’re the perfect size and height for nestling/hiding in baskets. Hope that helps!
Best,
Steph
Ranunculus are such showstoppers—these tips make arranging them look so simple and elegant!
They really are! Glad this article was helpful 🙂