
*This post may contain affiliate links, which means I may receive a commission (at no additional cost to you!) if you make a purchase using any of these links.*

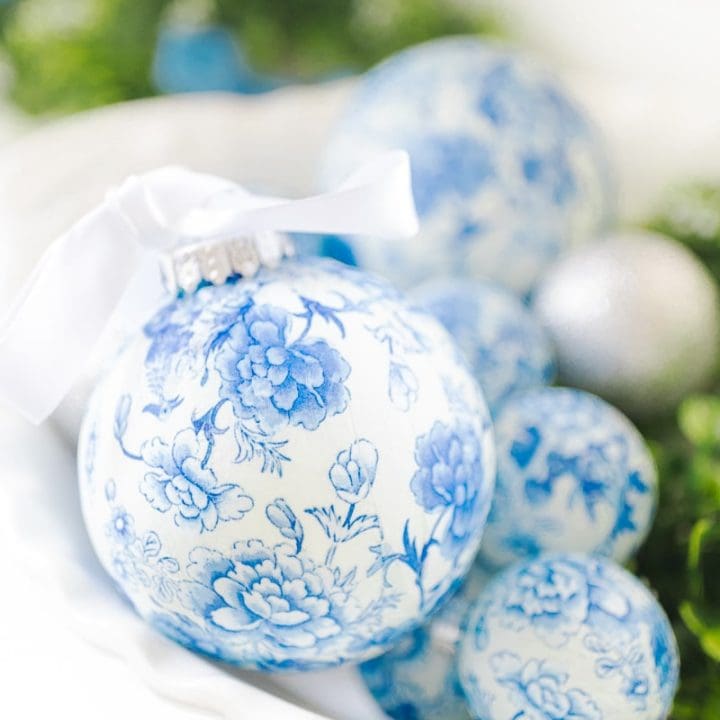
You know the whole “If You Give a Mouse a Cookie” story? Well, turns out craft projects are my proverbial cookies. I loved making these DIY chinoiserie pumpkins so much that decoupage ornaments were the obvious next sequential step. Just like my beloved pumpkins, these DIY chinoiserie Christmas ornaments are seriously so easy to make, even if you aren’t particularly crafty, and they compliment existing blue and white Christmas decor beautifully! That being said, you can choose whatever paper cocktail napkins you like for this project, so if you’re more into a traditional red and green Christmas or whimsical white and pink color scheme, this decoupage method works for those, too. Keep reading for a step-by-step decoupage ornaments tutorial and short how-to video!
DIY Chinoiserie Christmas Ornaments

Materials
Here’s everything you need to make your own Chinoiserie ornaments–
- Round white ornaments of any size– If your ornaments are clear, swirl some white acrylic paint inside. That’s what I did with these clear balls from Michaels, and it really helped make the pattern pop! I can’t find these exact ornaments online, but they’re shatterproof, 6 inches in diameter, and great statement ornaments. I also ordered these 2.5″ ornaments for my second pattern and appreciated that they’re already white! They’re glass, though, so beware if you’re making these with kiddos.
- Fabric Mod Podge– I poured a small amount of Mod Podge onto a paper plate and then just added more as needed. Keep in mind that regular Mod Podge works too, although in my experience it also makes napkin tearing much easier.
- Blue and white paper cocktail napkins– I ordered these from Amazon and highly recommend this brand. Their products are well made and durable, which are necessary qualities for decoupage projects. Otherwise, the tissue tears wayyy too easily, and you’ll end up wanting to pull your hair out.
- Thin sponge brush- I use 1″ sponge brushes for all my decoupage projects!
I also used some old wine shipping packaging as an ornament holder while crafting. Crumpled up tin foil or old egg cartons (depending on the size of your ornaments) work well, too!
Decoupage Ornaments Tutorial
Making chinoiserie Christmas ornaments is so much easier than you think! Remember that you can use whatever paper cocktail napkins you like, so pick out a few different patterns and see which ones turn out the best. I used these napkins and these napkins (same trusted brand) for our tree this year.
First, grab some pretty blue and white paper napkins and cut off any borders. Also remove any extra layers of tissue so that the napkins are only 1-ply thick (for reference, these were 3-ply) and then cut them into thin strips. If you’re going for a cohesive picture, I recommend keeping the strips in order so that everything lines up seamlessly. If you don’t mind shuffling and/or are going for a more abstract motif, mixing up the strips looks pretty cool, too!
Next, pour some fabric Mod Podge onto a disposable plate and secure your ornament so that it can’t roll around. For reference, I used some old wine shipping packaging I found lying around. Dip a narrow sponge brush in the Mod Podge and paint a light vertical stroke onto the ornament. Position the center of the napkin strip in the center of the ornament and then gently smooth it down. Use the sponge brush to flush out any wrinkles, and be sparing with the Mod Podge! A little goes a long way, and speaking from experience, too much creates a tearing nightmare.
Then, overlapping them slightly at the top so that there aren’t any gaps, lay down the next napkin strip, making sure to line it up with the previous strip to create a cohesive pattern. Continue until you’ve worked your way around the ornament and then cut off any extra tissue on the top and bottom. Dab a layer of Mod Podge on each end and use the brush or your fingers to smooth down the loose ends. Keep in mind that the top will be hidden under the cap, and the bottom won’t be super visible, so neither end needs to be neat.
Finally, pop on the cap, give your chinoiserie ornament at least two hours to dry (or more depending on how much Mod Podge you used), and you’re all done! Repeat this process with as many ornaments in as many patterns as you like!

Aren’t they beautiful? I love that you can use this same technique (formally known in the crafting world as decoupage) with literally any patterned napkins. You can also use it to decorate champagne bottles, pumpkins, and so much more! Next up for me? Holiday chargers!

DIY Chinoiserie Ornaments
Even the most inexperienced crafters can master making these beautiful DIY chinoiserie Christmas ornaments! All you need is a round ornament (of any size), some blue and white paper cocktail napkins, and fabric Mod Podge to try this project at home!
Materials
- Round white ornament of any size (if not clear, swirl some white acrylic paint inside)
- Fabric Mod Podge
- Blue and white paper cocktail napkins
- Thin sponge brush (preferably 1″)
Instructions
- Grab some pretty blue and white paper napkins (I used these for this project) and cut off any borders. Also, remove any extra layers of tissue so that the napkins are only 1-ply thick and then cut them into thin 1" strips. If you’re going for a cohesive picture, keep the strips in order so that everything lines up. If you're going for a more abstract motif, intentionally mixing up the strips can look pretty cool, too.
- Next, pour some fabric Mod Podge onto a disposable plate and secure your ornament (with shipping packaging, crumpled tin foil, an old egg carton, etc) so that it can’t roll around. Dip a narrow sponge brush in the Mod Podge and paint a light vertical stroke onto the ornament. Position the center of the napkin strip in the center of the ornament and then gently smooth it down. Use the sponge brush to flush out any wrinkles.
- Lay down the next napkin strip, making sure to line it up with the previous strip to create a cohesive pattern (note: disregard if you're going for an abstract look). Note that you'll need to overlap the strips slightly at the top so that there aren't any gaps. Continue until you’ve worked your way around the ornament and then cut off any extra tissue on the top and bottom.
- Dab a layer of Mod Podge on each end of the ornament and use either the brush or your fingers to smooth down the loose ends. Keep in mind that the top will be hidden under the cap, and the bottom likely won’t be visible either, so neither end needs to be neat.
- Pop the ornament cap back on and give your chinoiserie ornament at least two hours (or more, depending on how much Mod Podge you used) to dry.
Notes
Keep in mind that you don’t need to seal Mod Podge. It’s technically a glue, sealer, and finish all in one. Still, if you’re worried about humidity or longevity, apply a varnish or polyurethane finish on top of the dry napkin strips. That should do the trick!
Decoupage Tips
- Don’t go crazy with the Mod Podge, otherwise your hands will get sticky and potentially tear any (and all) napkins you potentially touch.
- I tried my hardest to line up the napkin strips exactly for image continuity, but it's okay to overlap and mix up strips. It can actually look really abstract and fun.
- Don't beat yourself up if any of the napkins tear. When you combine glue with ultra thin napkin tissue, it's almost impossible for one or two of them not to. Just use a few of the leftover napkin scraps to fill in any tears or gaps in the pattern. Trust me, nobody will notice!
More Easy Christmas Ornaments to Make
I love a good holiday DIY, and ornaments can be fun to make for the whole fam. Here are a few easy Christmas ornament projects to try–
- DIY Monogram Glitter Ornaments– These monogram glitter ornaments are so gorgeous, and they look like they take hours to make, even though the process is so quick and simple! I used my Cricut to make these, though, so if you don’t have a smart cutting machine, grab some vinyl stickers at the craft store instead.
- Etched Monograms on Glass– Okay, so this tutorial is technically for etched monogram champagne flutes, which I realize aren’t ornaments. Still, this technique works on any glass ornaments you can find and makes really gorgeous personalized gifts! I use a smart cutting machine to make my stencils, but again, craft stores carry stencils, too. Give it a try!
Well, that’s all I’ve got for y’all today! Thanks so much for reaching, and, as always, let me know if you have questions. Whether you need clarification on this decoupage Christmas ornaments tutorial or any of my other DIY holiday decor projects, I love hearing from you guys, and I’m happy to help!

