*This post may contain affiliate links, which means I may receive a commission (at no additional cost to you!) if you make a purchase using any of these links.*

Reese Witherspoon said it best– if it’s not moving, monogram it. Ever since I purchased my Cricut Explore Air 2 (a super easy-to-use smart cutting machine), I’ve been monogramming everything. Cricut makes designing your own monogram dangerously easy– and with some vinyl and contact paper, applying the decal is just as simple. There is a little bit of a learning curve, but once you get the hang of Cricut Design Space, you’ll be able to pump out custom monograms left and right. So far, I’ve monogrammed mugs, pumpkins, ornaments, and doormats– and I’ve got a monogrammed Easter basket and cheese board projects in the works, too. Keep reading for a step-by-step guide to designing the perfect Cricut monogram! I’m sharing 4 of my favorite monogram styles and breaking down how to recreate them each of them on your own.
What is a monogram?
First thing’s first– what is a monogram? According to dictionary.com, it’s a design consisting of alphabetic letters, commonly one’s initials, that can be combined or interlaced and are often printed on stationary, embroidered on clothing, or (in my case) applied as a vinyl decal on literally everything in my house. A monogram can be a single letter or initial, a first/last initial combo, or a first/last/middle initial combo. It’s also worth noting that a monogram can be for a singular person or for a couple, which is why monogrammed items makes such great wedding presents.
What are the different styles of monograms?
There are tons of different fonts and/or styles for Cricut monograms, but here are four of the most popular–
1. Vine Monograms
Vine monograms, also known as interlocking or old-fashion monograms, are the definition of classic. They feature lots of ornate swirls, and all the letters are interlaced (or, at the very least, they all touch). Fair warning– vinyl vine monograms are far in a way the most difficult to transfer. They’re beautiful once you get the hang of them, though!
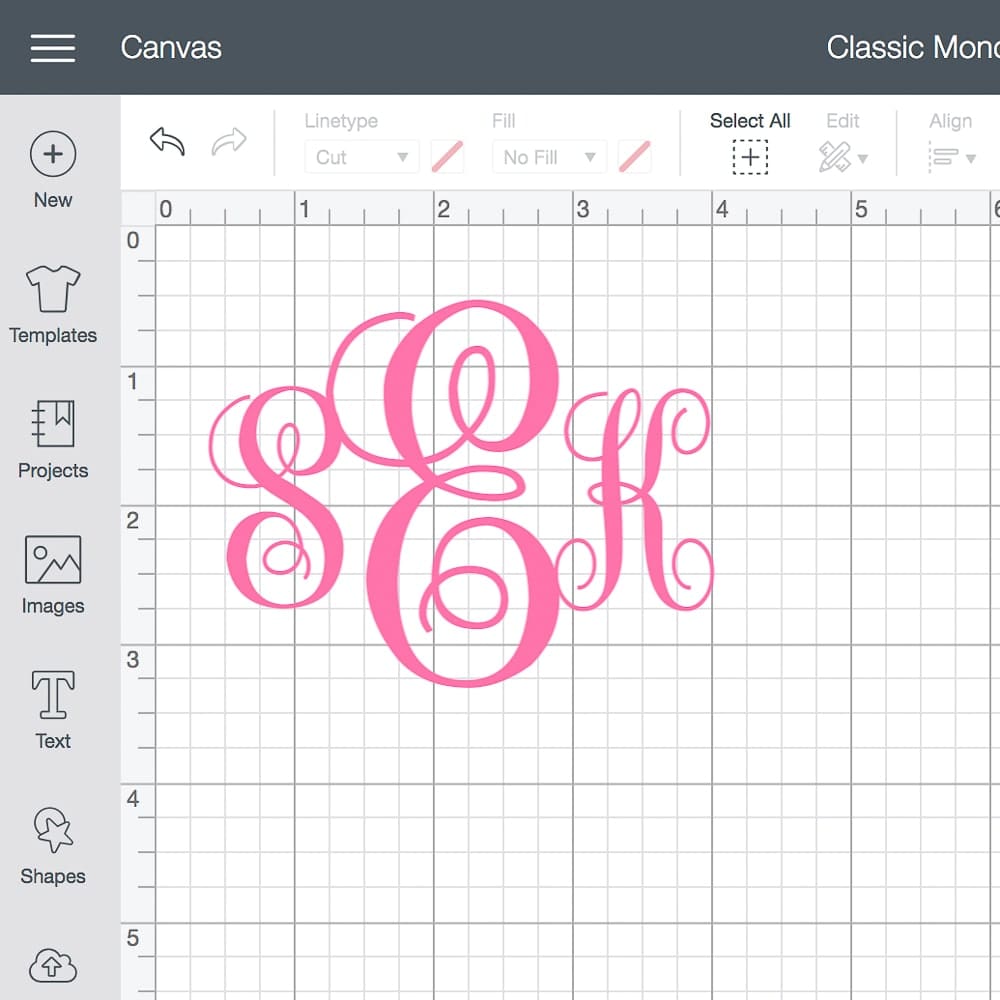
For reference, I’m using this free font below. If you want to sell any of the items you make, you can purchase a similar font for under $10 here. You can also check out Cricut Access for access to hundreds of Cricut Design Space fonts, thousands of images, and tons of Cricut design ideas. Plus, you’ll get 10-50% off Cricut product purchases and downloads, too.
2. Circle Monograms
Cricut circle monograms are ultra preppy and definitely one of the more popular Cricut monogram styles. They can be basic, doubled lined, framed, outlined, or scalloped. They transfer seamlessly and look great on cups, mugs, bags, keychains, etc., too!
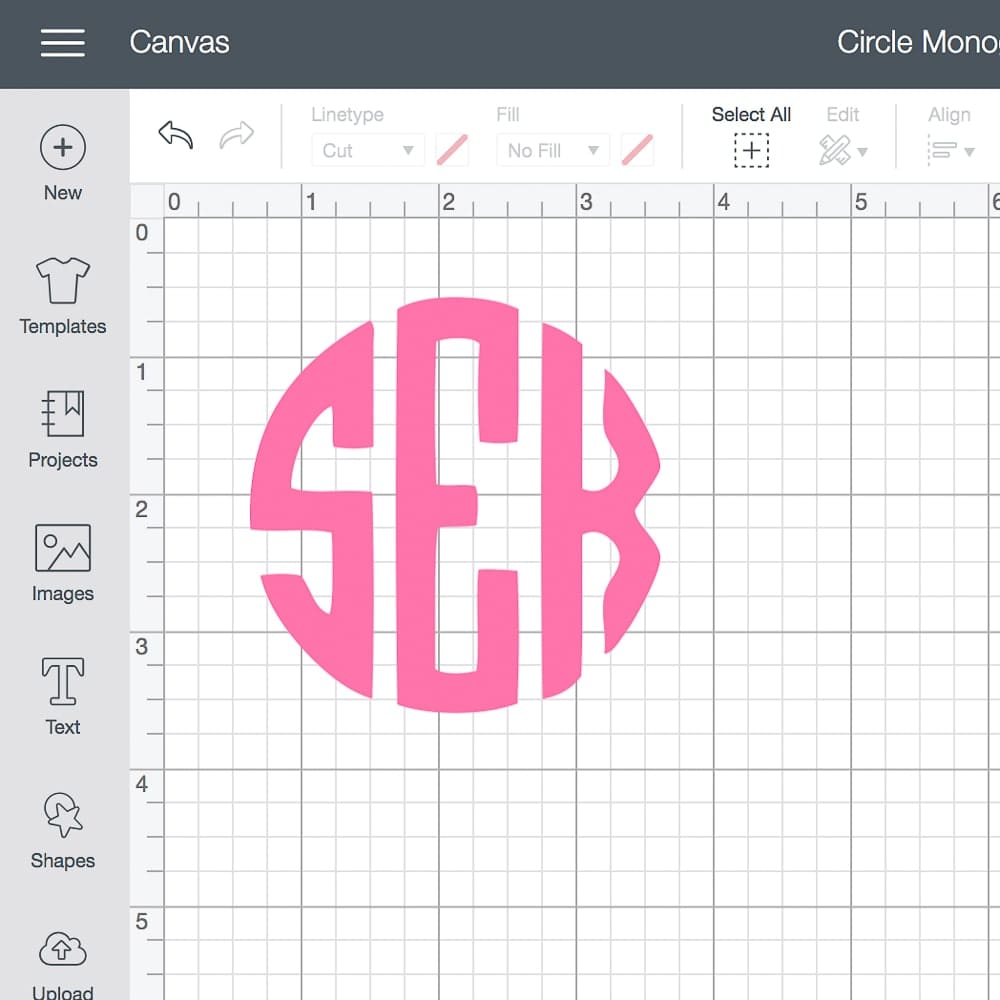
For reference, I’m using this free font below if you’re looking for free circle monogram fonts for Cricut. If you want to sell any of the items you make, you can purchase a similar circle monogram font for Cricut for under $10 here. You can also check out Cricut Access for access to hundreds of Cricut Design Space fonts, thousands of images, and tons of Cricut design ideas. Plus, you’ll get 10-50% off Cricut product purchases and downloads, too.
3. Heart Monograms
Since the letters are designed to fit in a specific shape, heart-shaped monograms are basically an extension of circle monograms. They’re perfect for girly projects, bachelorette favors, and pretty much anything Valentine’s Day-related.
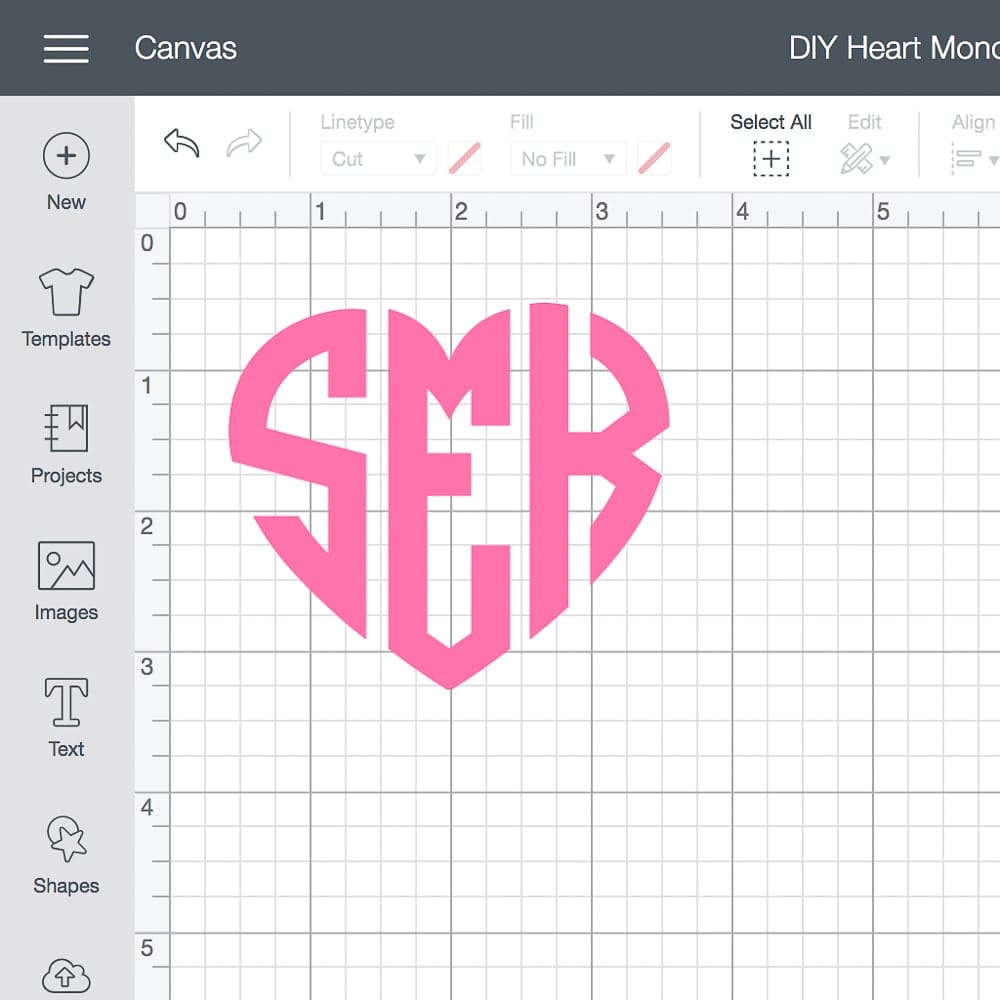
For reference, I’m using this paid font below. You can also check out Cricut Access for access to hundreds of Cricut Design Space fonts, thousands of images, and tons of Cricut design ideas. Plus, you’ll get 10-50% off Cricut product purchases and downloads, too.
4. Fishtail Monograms
Fishtail monograms are often chosen for embroidery (towels, sheets, etc) because they’re so classic. You can also add embellishments (circles, diamonds, etc) on both sides for more detail!
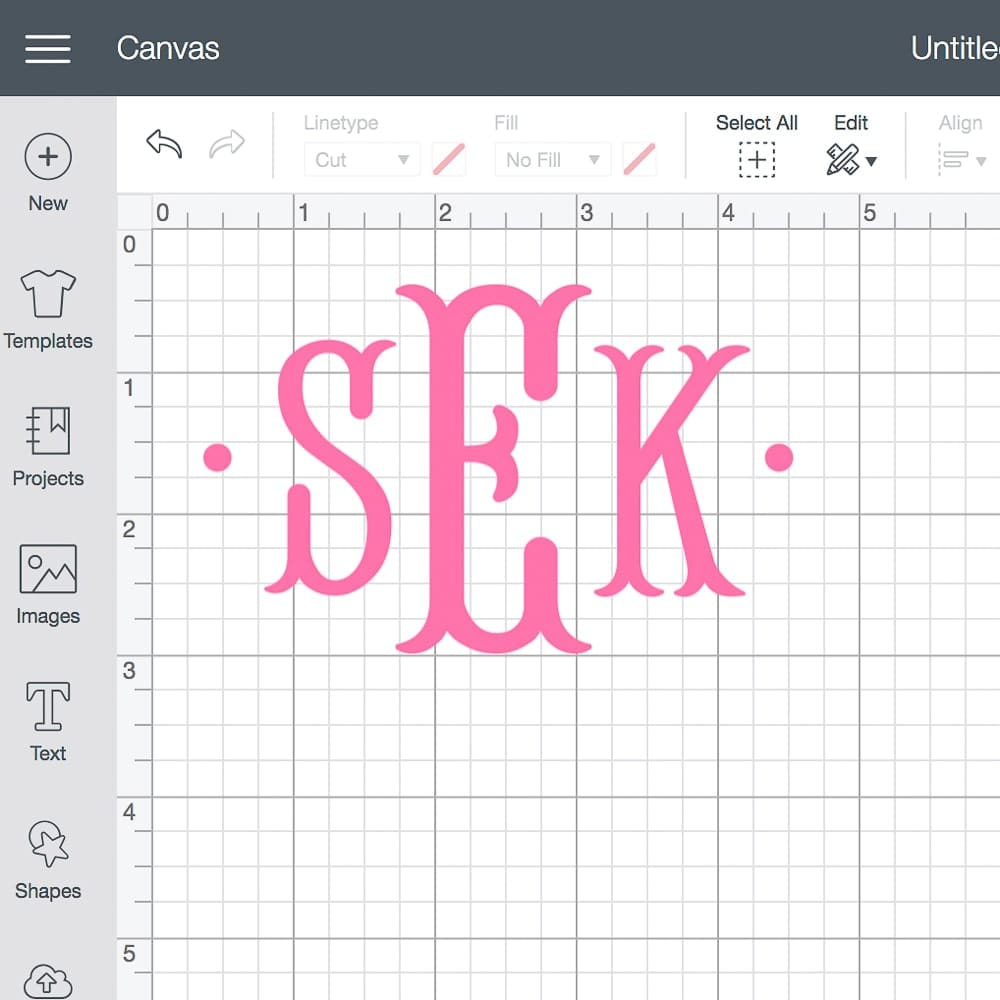
For reference, I’m using this paid font below. You can also check out Cricut Access for access to hundreds of Cricut Design Space fonts, thousands of images, and tons of Cricut design ideas. Plus, you’ll get 10-50% off Cricut product purchases and downloads, too.
How do you design a monogram in Cricut Design Space?
Seriously, y’all– designing monograms in Cricut Design Space is so much easier than you think. Once you beat the learning curve, you’ll be pumping out custom vinyl decals left and right. The process changes, though, depending on which monogram style you choose. So, I’m breaking down how to design your own monogram in 4 different styles (vine, circle, heart, and fishtail) below. In case these photos aren’t enough for you, you can click here for a video tutorial on how to make monograms on the Cricut. I’ll also be publishing my own Loom tutorials within the next few days or so!
1. How to Create a Vine Monogram in Cricut Design Space

Designing your own classic vine Cricut monogram is super easy, y’all. You’ll need to find and download a monogram font you like, though. I use this free font, although you may want to purchase this one if you’re planning to sell any products you make. Either route you choose, start by opening Cricut Design Space and typing in your initials in lowercase (first, last, middle).
Select the text and update the font to whichever classic monogram font you’ve downloaded. While your text is still selected, click Ungroup in the top right hand corner. You’ll notice you can now move each letter individually.
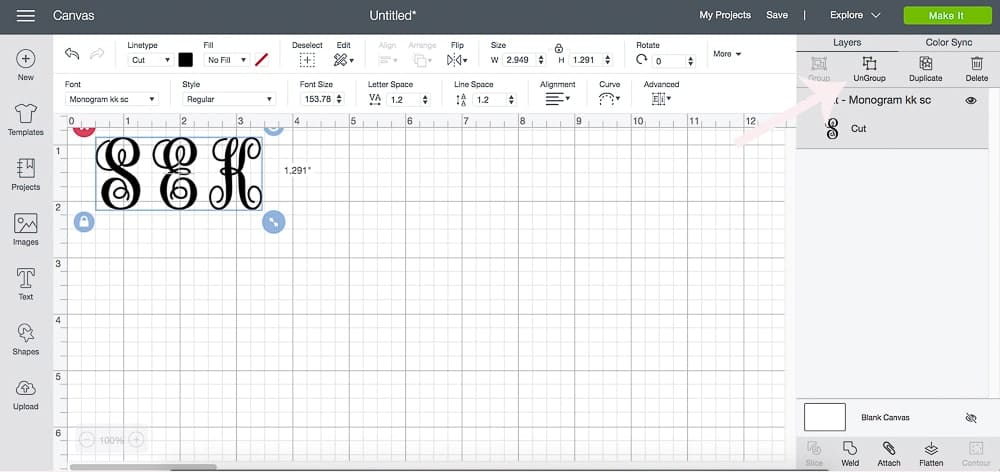
Keeping your first and middle initial the same size, increase the size of your last initial (I like to make mine about twice as big as the others) and move the letters into a line. Tip- I use the graph lines in Design Space to make sure my first and middle initial line up perfectly. Also, as a general rule of thumb with classic traditional monograms, all the letters should be touching.
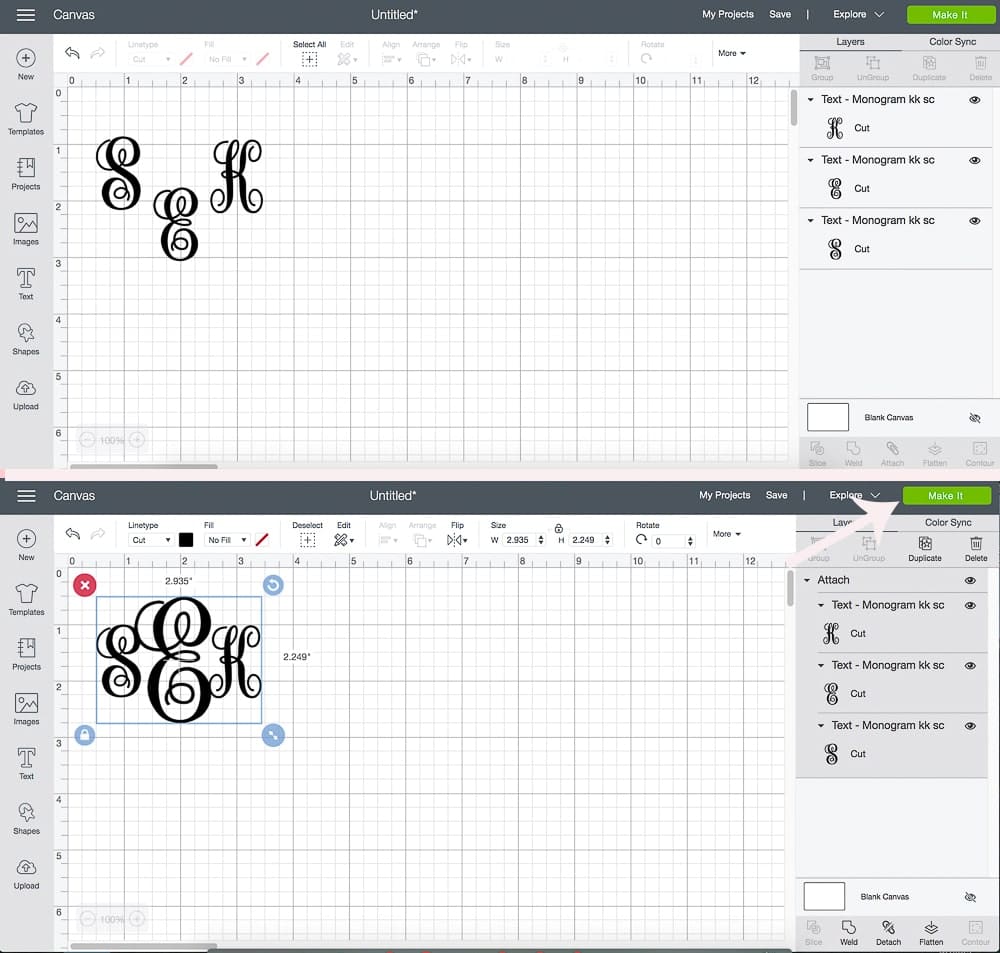
Once your happy with the way your vine Cricut monogram looks, select all 3 letters and click attach in the bottom right. Don’t hit “Weld” or else you won’t be able to detach the letters later (which is a handy feature if you want to create more than one). You can then click “Make It” in the top right or right click and copy/paste to create more monograms. You’ll just need to select each one and detach the letters to customize them.
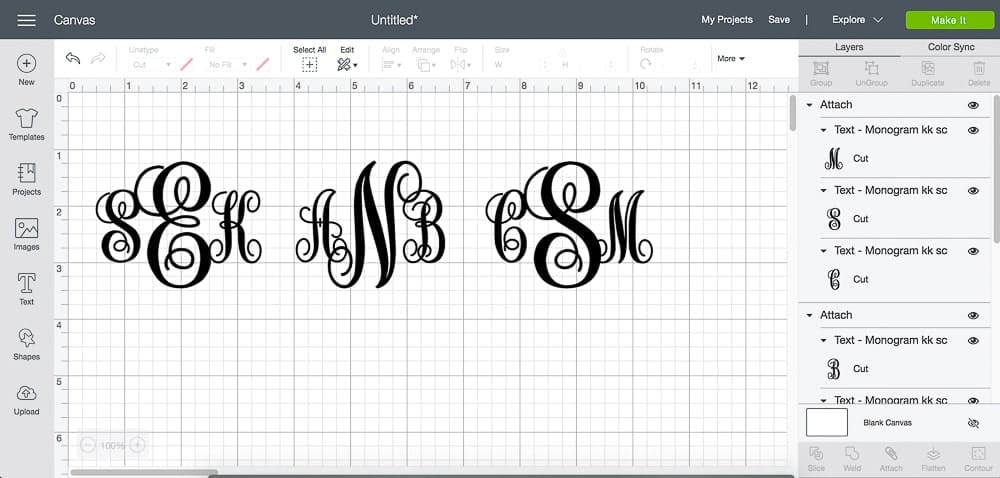
Since all these monograms are attached, you can use this template and adjust the size and spacing to fit your project. To customize it for yourself, you’ll need to select each monogram, detach the letters, and then add in your own.
2. How to Make a Circle Monogram in Cricut Design Space

Cricut circle monograms are super popular, but they’re also unfortunately the most tedious to create. First thing’s first, you’ll need to find and download a circle monogram font you like. I use this free font if you’re looking for free circle monogram fonts for Cricut, although you should purchase this one if you’re planning to sell any products you make. Either route you choose, start by opening Cricut Design Space, typing in your initials in lowercase (first, last, middle), and updating the font if it’s not selected already.
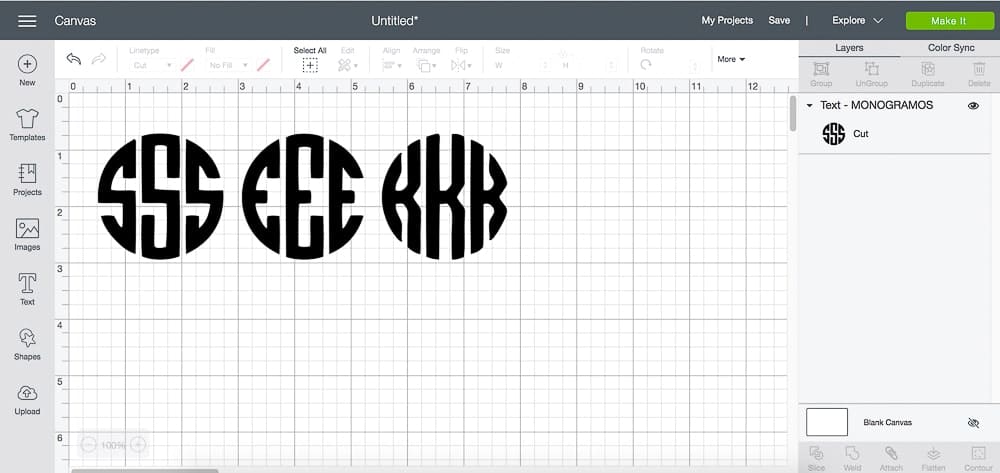
Next, select all three letters, which look like three separate monograms, and click ungroup. You’re going to work with each letter separately to slice out the part of the monogram you want. For example, in the above image, I need the left “s,” the middle “e,” and the right “k.”
To slice, click on Shapes in the left toolbar and select a square. Cover the portion of the monogram that you don’t want with the square, making sure to not touch any of the other letters. Then, select both the square and letter and click splice in the lower right hand corner.
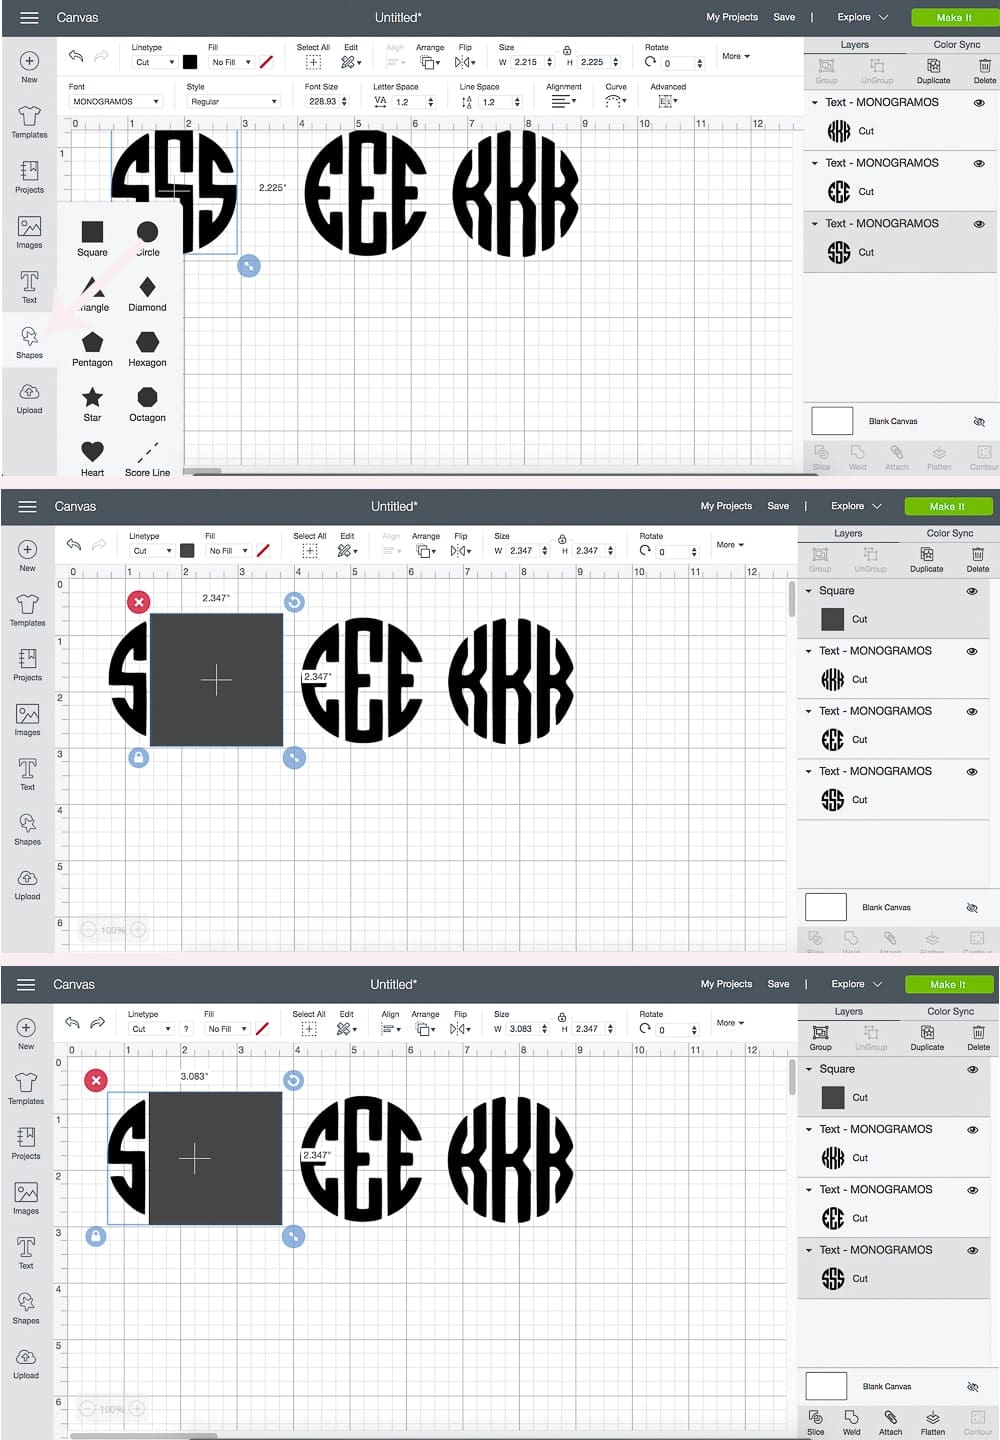
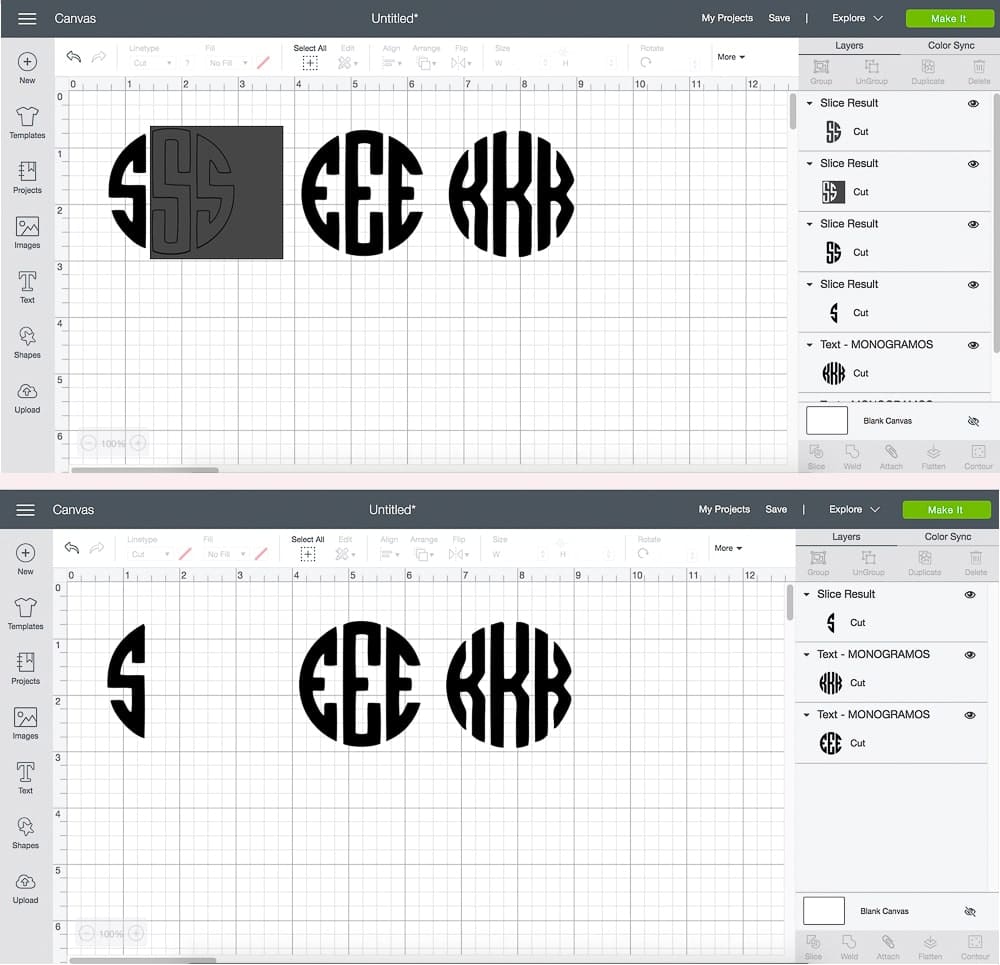
Select and delete all the discarded letters until you’re left with a singular initial. Repeat this same procedure for the middle name (right letter), too. The last name (middle letter) is a little trickier, so I’m showing how to extract it in the photo after this next one.
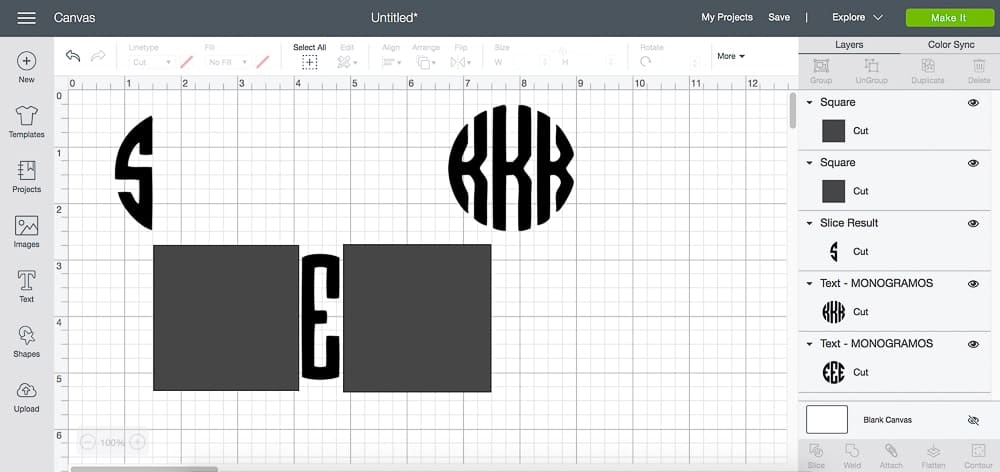
When extracting the middle letter, you’ll need to use two squares, one for both sides, but you can’t slice them at the same time. Start with one side (select both the square and letter) and slice– and then tackle the other side (select the other square and letter) and slice.
Finally, arrange the letters in a circle shape. If you’re OCD like me, you can insert a circle shape (click Shapes in the left tool bar and then click Circle) over the monogram to make sure everything lines up correctly. Select and attach them once you’re happy with the way your circle monogram looks.
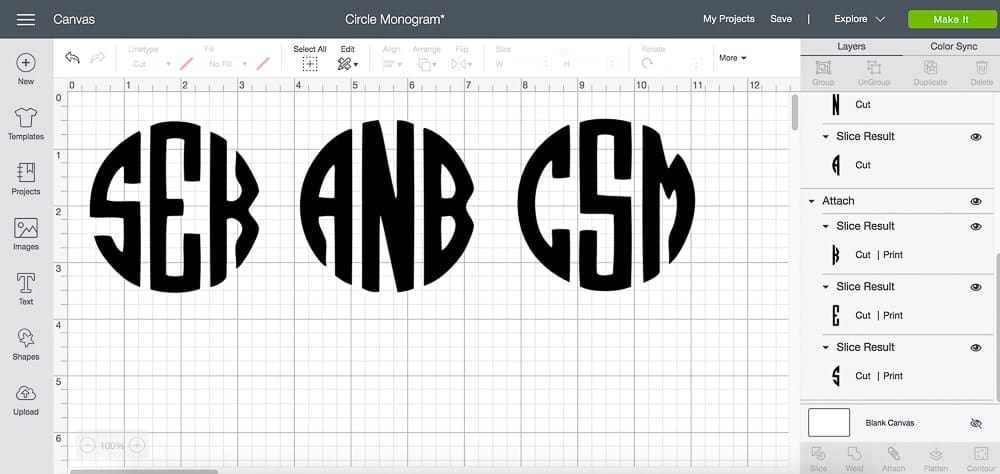
The bad news with Cricut circle monograms, though, is that they’re not copy/paste-able thanks to all the slicing. If you want to create more than one, you’ve got to start from scratch. Fortunately, though, once you get the hang of ’em, you can pump them out super fast!
3. How to Create a Heart Monogram in Cricut Design Space

To create your own heart shaped monogram, you’ll need to buy this font. I’m sure you can find a free version somewhere on the internet, but this one’s under $10– and it’ll save you from any legal issues if you ever decide to use the font to sell physical products. If you can’t bring yourself to buy a font, do a quick Google search for “Cricut monogram fonts.” You’ll find a few different options.
Once you’ve downloaded a font, open Cricut Design Space and type each letter in its own text box and adjust the font based on its position. For example, the “a” below uses the Heart Left font. The “n” uses the Heart Center font. The “b” uses the Heart Right font.
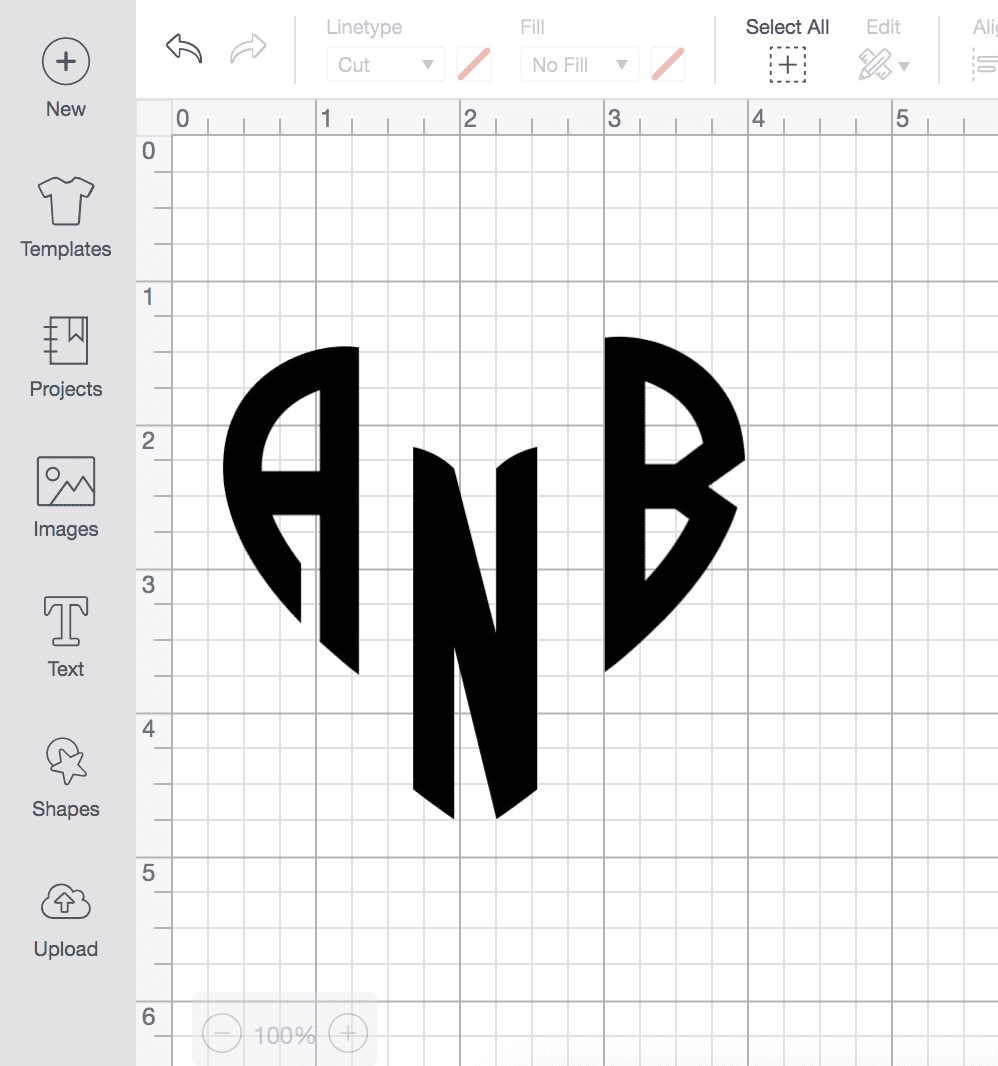
Next, select each letter and arrange them in a heart shape. As a guideline, I made sure to line up the letters’ bottom edges to create a smooth v-shape.
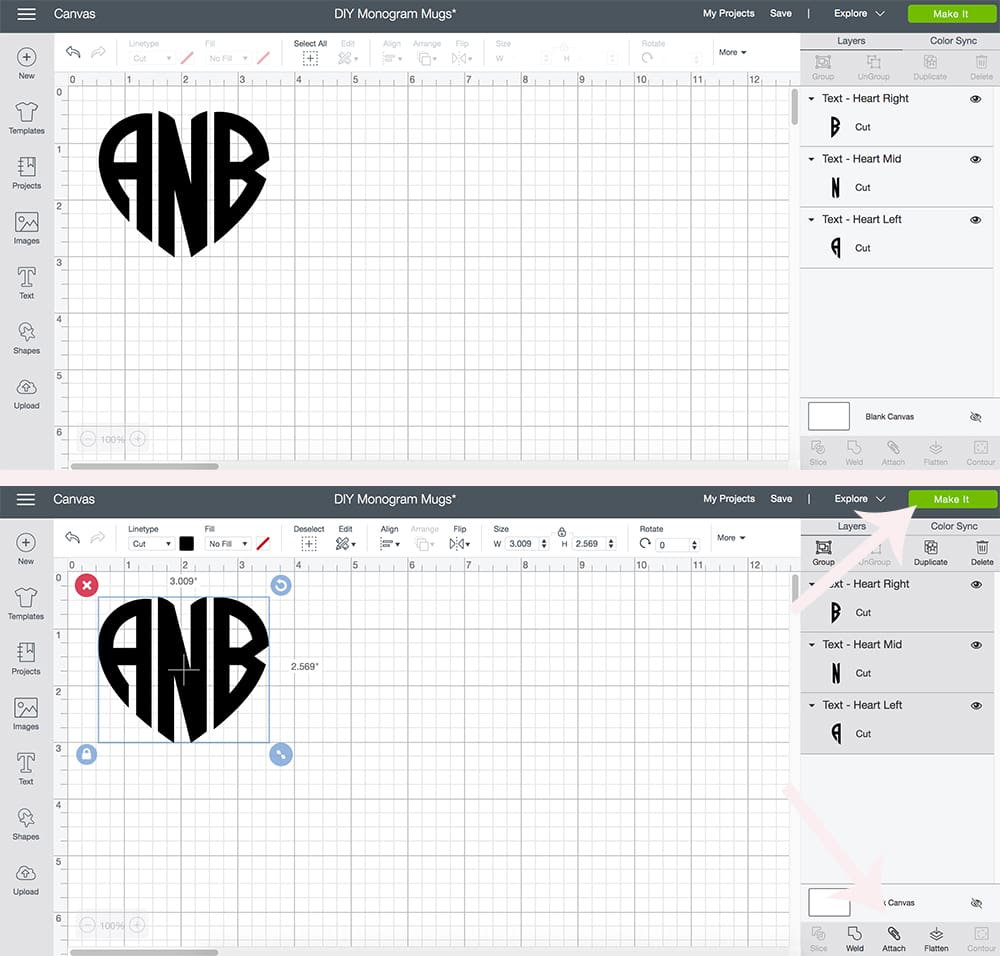
Once you’re happy with the shape and spacing, select all 3 letters and click attach in the bottom right. Don’t hit “Weld” or else you won’t be able to detach the letters later (which is a handy feature if you want to create more than one). You can then click “Make It” in the top right or right click and copy/paste to create more monograms.
Since all these monograms are attached, you can use this template and adjust the size and spacing to fit your project. To customize it for yourself, you’ll need to select each monogram, detach the letters, and then add in your own. This is the same scenario if you create your own and then copy/paste to duplicate them, as well.
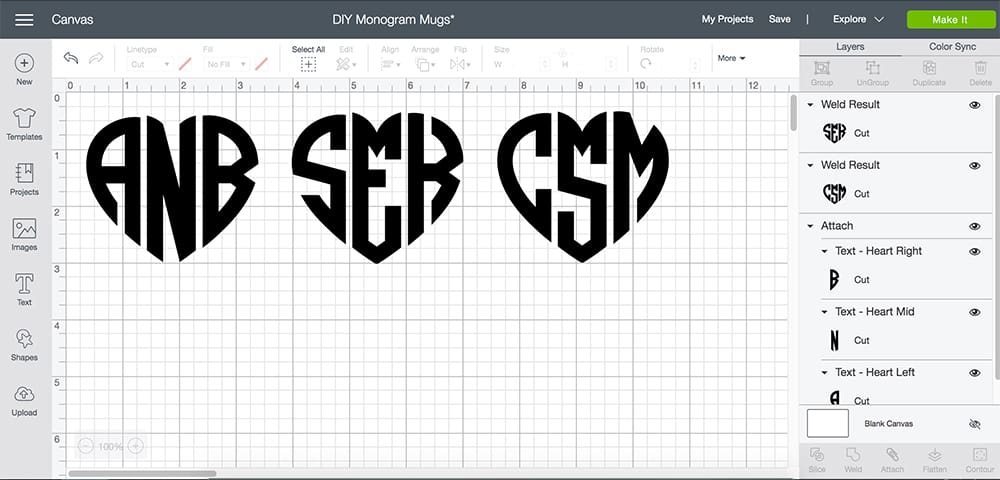
For a full Cricut heart monogram tutorial, click here!
4. How to Create a Fishtail Monogram in Cricut Design Space

Fishtail monograms are, in my opinion, the easiest to create. The key here is just finding a font you like. I ordered this one off Etsy and really love it, although you can type “free monogram fonts” into Google to see if there are any free versions you like more. Either way, start by opening Cricut Design Space and typing in your initials (first, last, middle).
Select the text and update the font to whichever classic monogram font you’ve downloaded. For reference, I’m using this one. While your text is still selected, click Ungroup in the top right hand corner. You’ll notice you can now move each letter individually.
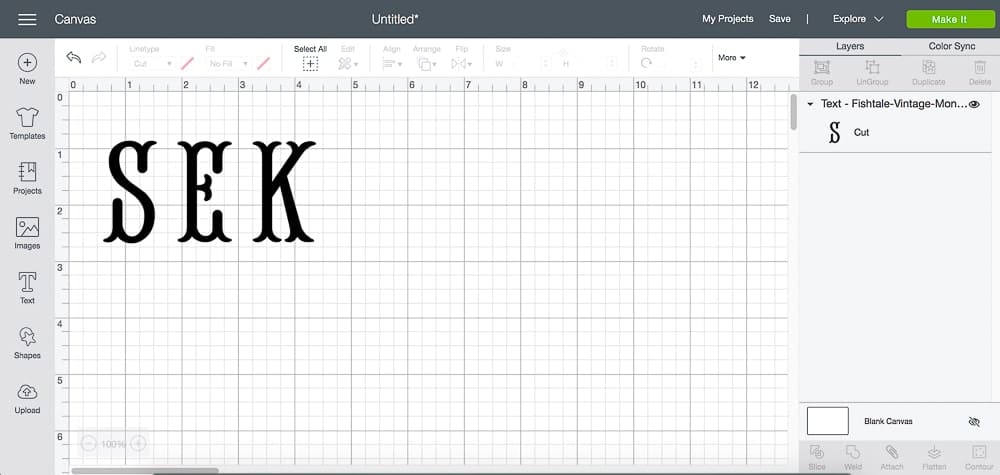
Keeping your first and middle initial the same size, increase the size of your last initial (I like to make mine about 1.5x the size of the other letters for fishtail monograms) and move the letters into place. Tip- I use the graph lines in Design Space to make sure my first and middle initial line up perfectly.
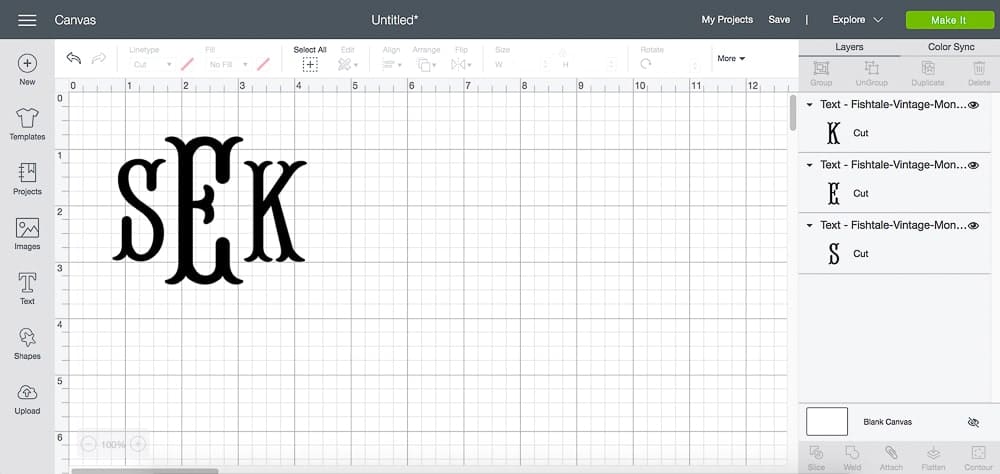
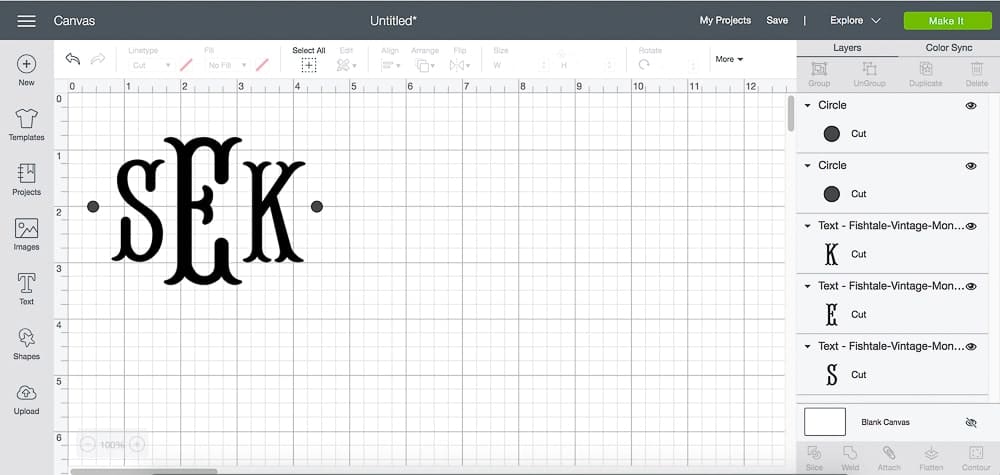
If you want to add a little something extra, use the Shape tool on the left toolbar to create a small circle. Once you’ve chosen a size you like, hit duplicate and mirror the circle on the other side.
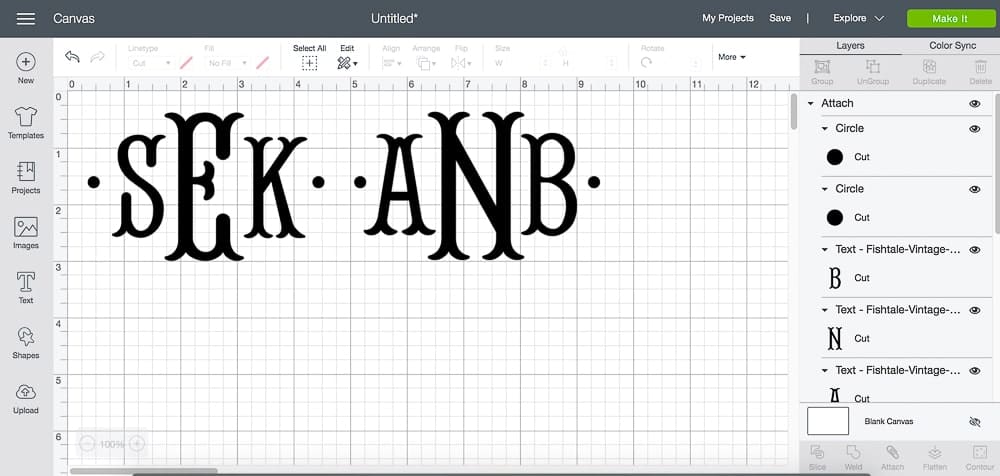
Once you’re happy with the way your fishtail Cricut monogram looks, select all 3 letters (and circles, if applicable) and click attach in the bottom right. Don’t hit “Weld” or else you won’t be able to detach the letters later. You can then click “Make It” in the top right or right click and copy/paste to create more monograms. You’ll just need to select each one and detach the letters to customize them.
What are some easy Cricut monogram gift ideas?
If you need some fun and easy Cricut monogram gift ideas, you’re in luck. Here are a few of my favorite monogrammed DIY gifts that I’ve made with my Cricut Explore Air 2—
- Monogrammed Heart Mugs
- Personalized Doormats
- Monogrammed Christmas Ornaments
- Monogrammed Glitter Pumpkin
Other great DIY monogrammed gift ideas are phone cases, cozy accessories (like tote bags, toiletry bags, blankets, and robes, although you’ll need a Cricut Maker instead of a Cricut Explore Air 2), monogrammed wall prints– the list goes on and on! For more DIY gift ideas, you may want to check out Cricut Access. It’s a fun subscription service that gives you access to hundreds of Cricut design space fonts and thousands of images, plus 10-50% off Cricut product purchases and downloads.
Anyways, that’s all I’ve got, y’all! As always, let me know if you have any questions. Whether you need help designing a Cricut monogram or figuring out which Cricut or smart cutting machine is right for you, I’m a fanatic, and I live for this stuff. Leave me a comment or shoot me an email whenever– I’m happy to help! Also, if you feel like I left something out of this tutorial, please let me know. I’ll supplement as soon as I’m able!
Thanks for reading, everyone!


Can you monogram on clothing??
someone told me they used their Cricut to monogram an iron-on to bridesmaids pj’s??
Yes!! It’s pretty easy, too– you just need HTV vinyl and an iron or EasyPress. They’re not t-shirts, but I made a tutorial for wine gifts bags a few months back– the process is the same for both :) Hope that helps!
Best,
Steph